Picture this: You are winding down after a long day of work, enjoying a lovely, relaxing bath when, all of a sudden, you open your eyes and stare at the retro tile that is just not your style. Perhaps it’s that old countertop that is falling apart, or the vintage linoleum floor that’s peeling at the edges. You know what I’m talking about. Those little peace-destroying details that you wish you could update.
It’s not always feasible for people to hire a general contractor and do a full-scale bathroom remodel, but if you keep reading I’ll let you in on how to create a renovation plan that suits your situation, whether you’re hiring professionals or going full DIY, and give you some interior design advice that will make your project much less stressful.
Let’s get started!
Taking the Right First Steps
Doing anything yourself, especially for the first time can be intimidating. I’ve created a FREE resource that will help you prep for your bathroom renovation and any home renovation you may want to do in the future. You can get it at the link below.
This guide is packed with information and will help you:
- Define your priorities
- Set a realistic budget
- Choose the right project team
- Understand building permits
- Prepare to interview potential contractors and designers
- Discover referrals and pre-bookings
I want you to be able to tackle your project with confidence, avoid mistakes that will cost you money and have a great renovation experience. And that starts with the right preparation.
The Budget Part of Budget-Friendly
Before we get into the details, I’d like to help you set your expectations before even considering a bathroom remodel, so there won’t be any surprises. If you’re in Vancouver, Canada, simply refreshing the space by updating materials and fixtures without changing the layout can cost anywhere from $10,000 to $30,000, and a full bathroom remodel will cost even more. I go into more detail about budgets here, including where you can expect to spend your money and the importance of adding a buffer to cover any unforeseen issues.
We’ll talk more in a bit about the best places to invest, and items you can save on to ensure that you’re maximizing your budget.
So You’re Renovating Your Bathroom…
Refreshing your space can be so much fun.
Picking paint colours and fixtures.
Finding that perfect finishing touch.
But before you get too far into the finished product, always consider your starting point and the bones of your space.
- Do the floors squeak in certain places? (terrible at 2 AM.)
- Is your bathroom close to a common area or is it an older home with poorly insulated walls? (Nothing like trying to take care of business when your partner is 20 feet away in the kitchen! Yikes!)
- Are you hearing buzzing in the walls? (We had a wasp nest in our bathroom ceiling when we demo’d it and had to make sure we sealed off the entry point from the exterior so it didn’t happen again.)
These are just some of the structural issues that can solved when you’re renovating and can make a world of difference to the result.
Where to Spend and Where to Save
While it can be fun to create the space of your dreams, it can also be a bit overwhelming. Where people often start to struggle with budget is where to spend it. As an interior designer, here’s how I recommend allocating your budget.
Save On
Mirrors: you can find beautiful and cost-effective mirror solutions at online retailers like Wayfair or Amazon.
Vanities: There are also lots of places to find prefabricated vanities. As long as you have the correct measurements you can find these online or at places like Costco.
Accessories: Your paper holders, hooks and towel bars don’t have to be the same line as your fixtures as long as they are the same finish. So shop around!
Invest In
Plumbing Fixtures: There’s nothing worse than a shower that won’t shower. Choose a reputable brand that stands behind its warranty and is proven to last.
Tile (and Installation): Choose a tile that makes the most sense for your lifestyle (remember, you have to clean it!) and a proven tile installer. It makes all the difference.
Paint: It may seem like an easy place to save money, especially with paint costs being so high, but please don’t skimp on water-resistant paint. There is a ton of moisture in bathrooms with showers and it will save you from having to repaint and or get rid of mold in the long run.
If You Want More
Of course, I can’t leave you without a few designer details that I love if you’re looking for areas to splurge (budget allowing!). Keep in mind, that these come at a higher price point, typically because the installation work is higher.
Curbless Shower: Standard showers either have a shower pan or a shower curb to keep the water in the shower area, but curbless showers are great for easier access, especially for people who are older or have injuries that make stepping into a standard shower more difficult. For this type of shower, the slope needs to be recessed below your floor level. These details will need to be discussed with your contractor on how to properly accomplish it without affecting the structural integrity of your floor joists below.
Linear Drains: This is a great pairing for a curbless shower, because not only does it look beautiful, but it’s nice because the drain is not underfoot. It helps with the sloping towards your fixture wall to allow for easy access if you need support while showering.
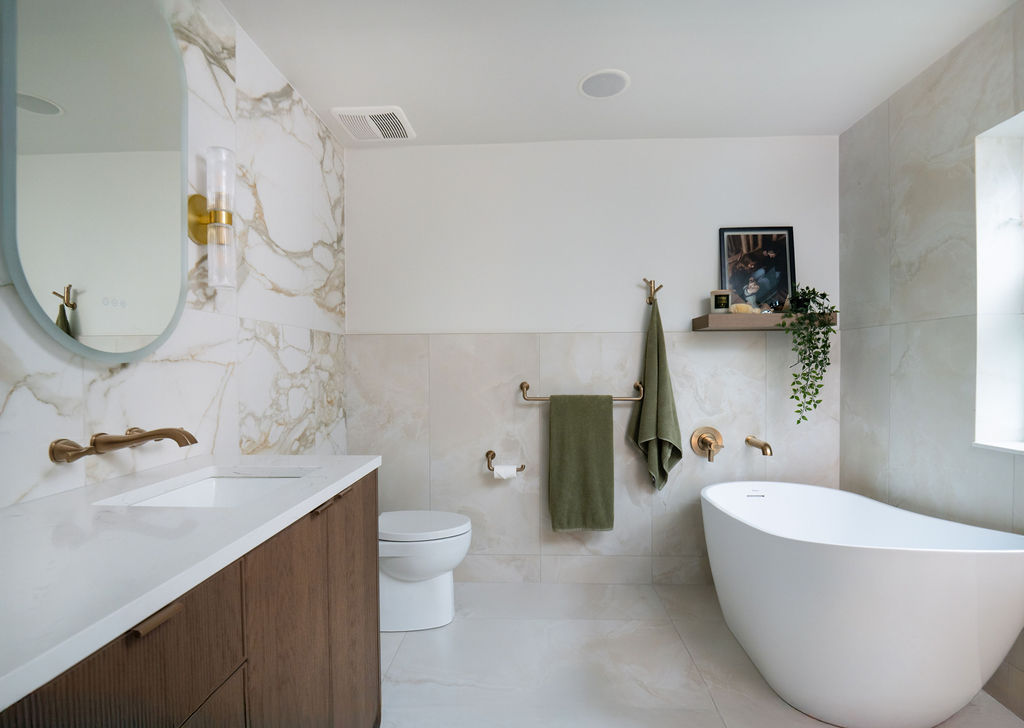
Freestanding Tubs/Freestanding Tub Faucets: She is beauty, she is grace and she adds luxury to any room she is in. Freestanding tubs and faucets can be an excellent centerpiece, making any bathroom feel like a spa.
Pro tip: Hop in the tub in the showroom before purchasing. Depending on how tall you are, some tubs can swallow you right up! You want to be sure you’re getting the one that will enhance your bath routine.
Do It Yourself ‘Dos’ and ‘Do Nots’
You’re ready to roll up your sleeves and get to work. These are the areas where it’s easy to save on labour:
Painting: if you have a steady hand and patience you can paint yourself. However just know if you have any sconces or pendant lights, the lights will shine on the walls and show every imperfection, so if you are DIYing your paint, smooth drywall sanding and prep work prior is key so it doesn’t look DIY.
Mounting Accessories: Depending on how handy you are, it can be pretty straightforward to install hooks, towel racks and other finishing accessories.
Unless you have experience I strongly recommend hiring professionals in these areas:
Tile Installation and Glass Installation: Tile, always. It makes such a huge difference when it’s done by a professional. Glass, when it’s floor to ceiling, because hiring a professional ensures it’s done correctly.
Demo Disposal: Have someone get rid of things correctly. And, if your house is pre-1990 be sure you get asbestos testing first. If your home does have asbestos, have it removed professionally. (You can always talk to your contractor about this first if you are unfamiliar!)
Here’s to a Relaxing Night in Your New Bathroom
Creating the bathroom you’ve been dreaming of is absolutely achievable with the right preparation and guidance. And if you’re planning to take on your renovation yourself, having a clear plan makes all the difference.
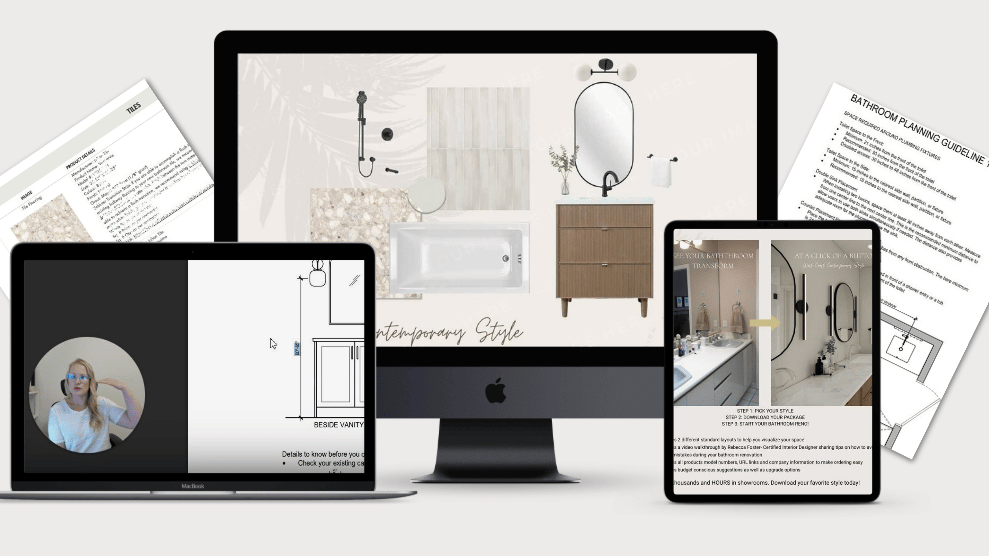
That’s exactly why I created my Bathroom Design Guides. These downloadable guides walk you through every decision you need to make, while also providing fully curated design options so you’re not starting from scratch. You’ll get a clear checklist of what to consider, professionally selected finishes based on different design styles, and video tutorials that explain upgrade options and help you move forward with confidence.
Instead of second-guessing your choices or piecing information together from dozens of sources, you can simply choose the style that fits your home and follow a proven framework.
Browse the Bathroom Design Guides and choose your style to get started today.