
It’s old and grungy.
There’s not enough storage.
It’s just not my style.
Are all thoughts you may have had about your bathroom.
It’s too expensive.
I don’t know where to start.
How do I choose what to do?
These are all thoughts you may have had about a bathroom renovation.
I get it. Taking on a bathroom renovation is an adventure. But with a little guidance and some insider tips, you can DIY the bathroom you’ve been dreaming about, on a budget that works for you.
My own bathroom renovation experience included asbestos, a giant wasp nest, and juggling a renovation with an 8-month-old baby during a pandemic. If we can do it – so can you!
Curious about how we met these challenges and still managed to stay on budget?
Want all the details about what I would do differently?
Let’s walk through what you need to know about creating your at-home oasis and how I approached my renovation project as a certified residential interior designer.
Before You Even Start…
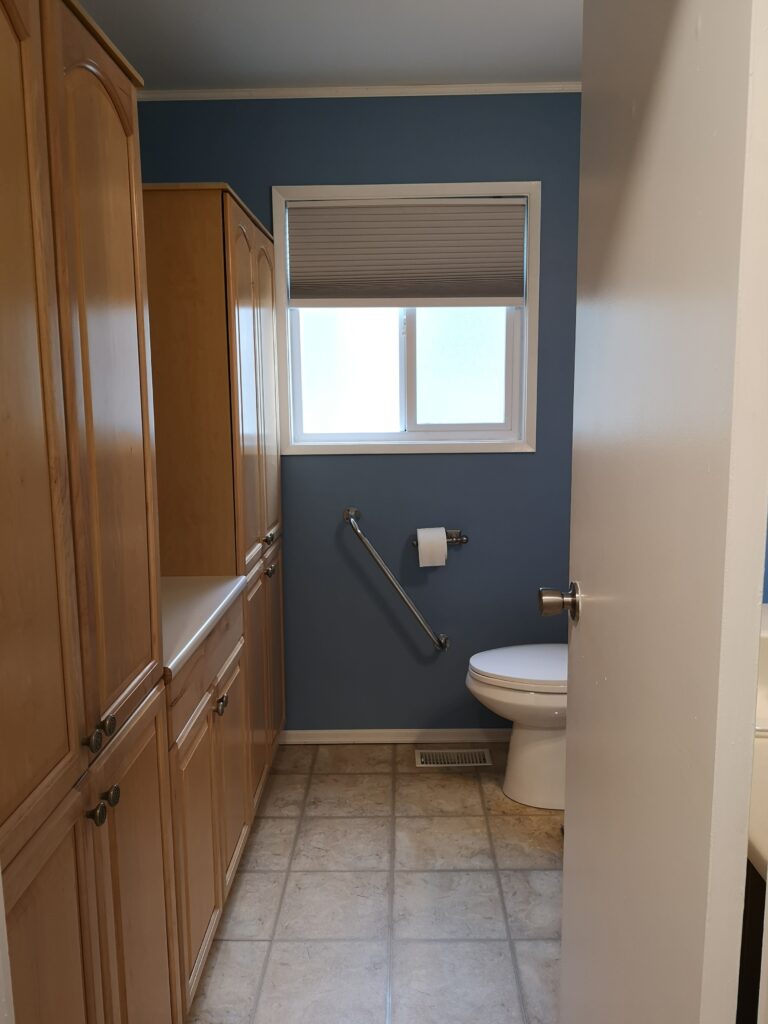
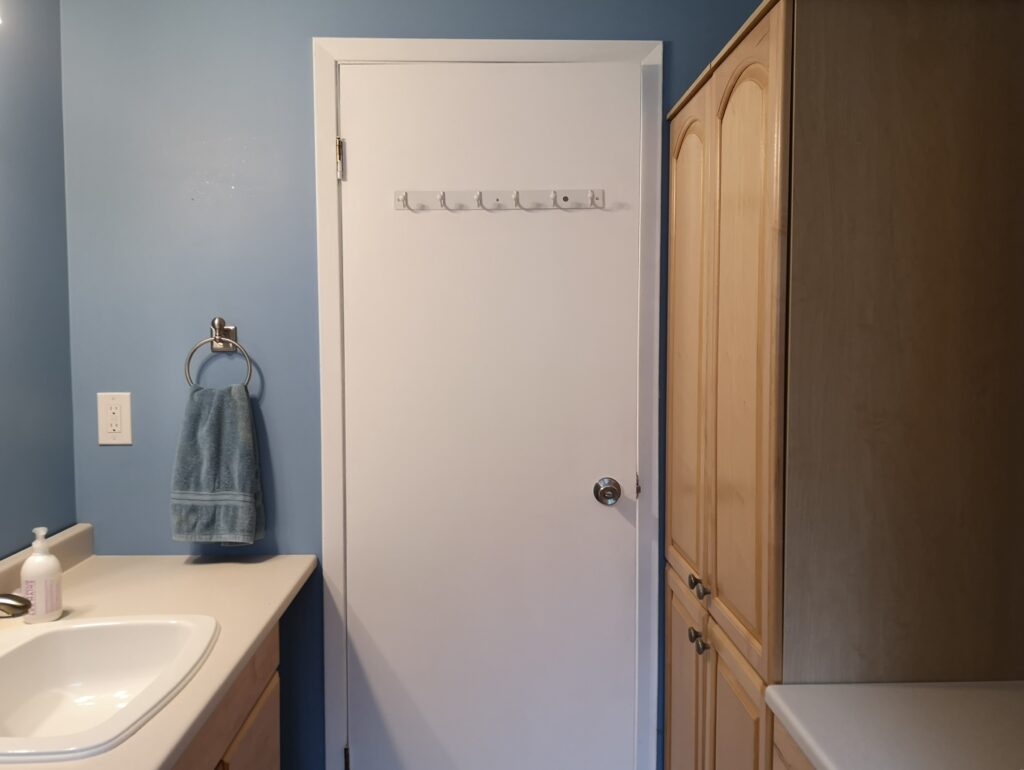
The first step in any renovation is planning and preparation. Our project was a 1974 bathroom that I was eager to transform into a stylish and functional space. For our bathroom renovation, my husband and I knew we wanted to renovate on a budget, and had a couple of priorities we aimed to meet.
Our 3 main priorities were:
- Add a shower to turn this 2 piece bathroom into a 3 piece bathroom for our growing family.
- Make budget friendly choices while keeping in mind we don’t plan to sell this home for at least 10 years so we were open to splurging on a couple items.
- Choose easy to clean materials.
Here’s how we prepared for our bathroom renovation ( and you should too!).
P.S. Are you planning a renovation? I go into a lot more detail about timing, permitting, hiring and more here ↓
- Create Your Plan and Set Your Budget
Start by defining the scope of work.
This is where you figure out what the extent of your renovation is. Are you ripping everything out to the studs? Are you moving plumbing? Or are you just changing out some fixtures and painting?
If you decide you’re updating the layout, this is also the time to create that new layout.
Making these decisions upfront is essential to helping you set a realistic budget. If you’re also doing an extensive renovation you need to know the answers to these questions so you can complete the next step.
- Check for Permit Requirements
If you’re doing a major renovation, you’ll need to apply for a permit. This includes drawing the necessary plans to get the required building permits. Your local government can help you with the requirements necessary to complete the application.
This is an important step to ensure that the renovation complies with local building codes and regulations.
- Choose Your Finishing Touches
Once your plans are approved, it’s time for the fun part. Selecting the finishes and truly designing the space! This included choosing tiles, fixtures, paint colors, and other design elements to bring the vision to life. Keep reading for my favourite recommendations!
- Source Your Materials and Fixtures
Collecting all of your materials and fixtures upfront will ensure you’re not waiting for materials and fixtures to arrive after you’ve begun your renovation.
Since I design every day, I already knew which quality (but cost-effective) brands I planned to use.
Here’s what we went with for our bathroom:
- Tile: Tierra Sol
- Plumbing: EMCO Ensuite in Burnaby
- Shower base: Arcritec
- Fixtures: Riobel
- Mirror: Layered Home & Living
- Lighting: Kuzco.com
- Countertops: Apex Granite
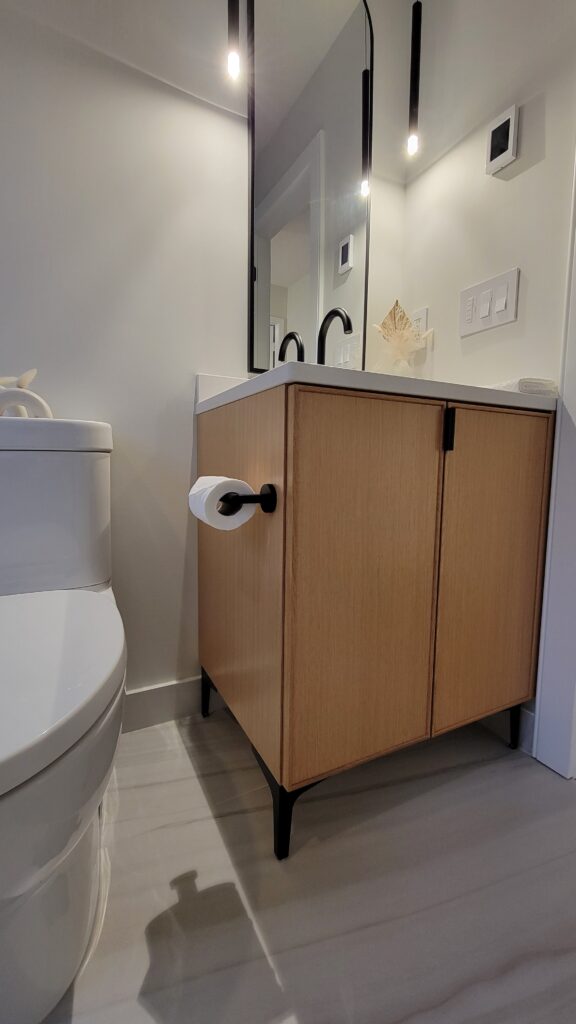
- Cabinetry: a supplier that I no longer recommend, but it is a rift-cut white oak and I love it.
These are the same brands I recommend to my clients, so they are a great place to start when planning your bathroom upgrade.
Be ready for some hard selections. While this part of the renovation should be fun, it can also be overwhelming with choices.
The hardest selection for me was picking the wall tiles. I initially wanted Zellige tiles because I love the look, but my husband focused on the reality of our situation. We’re a busy family that wouldn’t have time to keep up with white grout maintenance. So, we opted for large format tiles (24×48). This choice balanced aesthetics with practicality, making maintenance much easier. Don’t forget – you’re going to have to clean it!
Once you have everything prepped (and your permits are approved)…
The Renovation Can Begin
There’s never a perfect time to start a renovation.
For example, I initially believed that tackling our bathroom renovation during my maternity leave was a great idea because I thought I’d have all this extra time on my hands. I’m sure all moms are snickering right now. This was my first baby—can you tell? I didn’t really think through the fact that all work happens during the day and an 8-month-old still naps three times a day. This meant I either stressed about the baby not sleeping during the noise or we had to leave for walk naps every time someone was in our home.
That is to say, start when you’re ready and be prepared to be adaptable to get it done – it will be worth it!
Here are some key steps you will encounter during your renovation
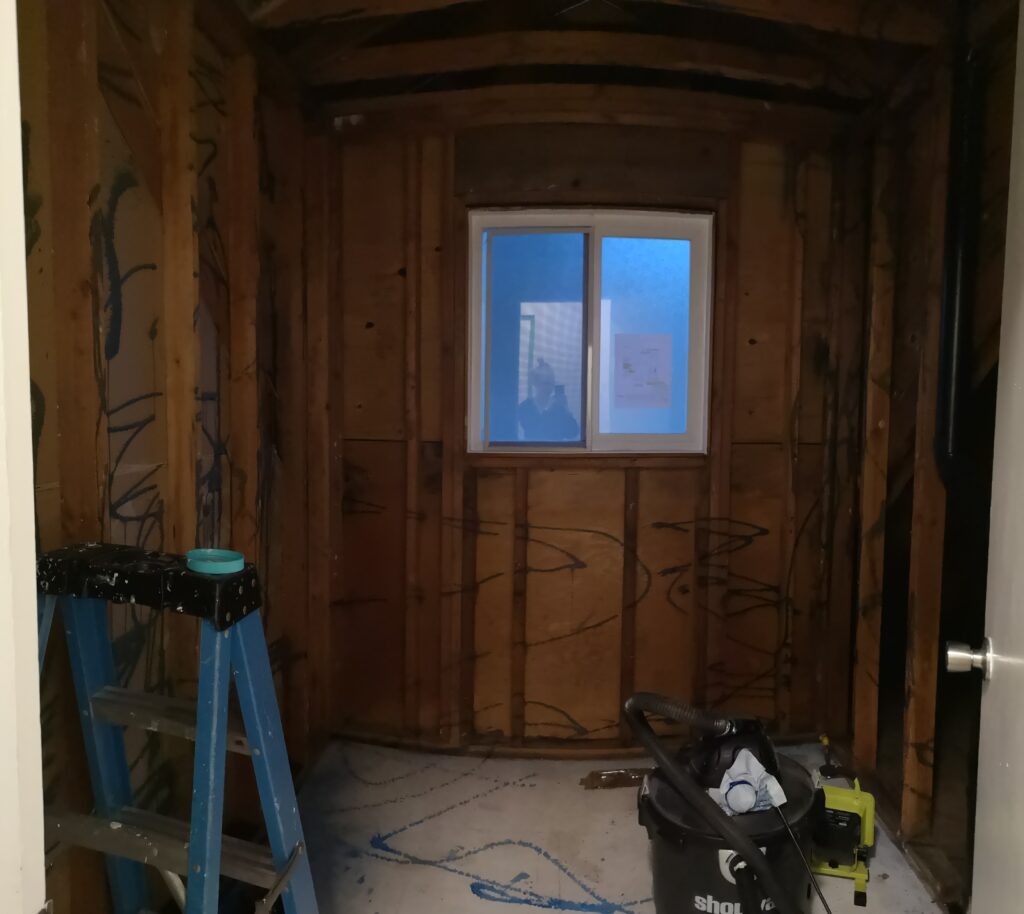
Demolition and Preparation
Because we knew our home was built in the 70s, we decided to test for asbestos. Just as we expected, we found it in the drywall and a few other spots in our bathroom. To ensure it was removed and disposed of safely, we hired professionals for the abatement. During the abatement and demolition process, we also discovered a giant wasp nest in the ceiling. This wasn’t a surprise since we’d heard buzzing the previous summer and we were ready for it. Like I said – be prepared for anything when you start pulling apart walls.
Safe demolition practices are essential. You can do the demo yourself but be prepared for what you might find. In older homes (pre-1990) you should test for asbestos, a fiber that, when released into the air can be harmful when you breathe it in. Asbestos could be in the insulation wrapped around your furnace ducts or pipes, or in your floor tiles and other areas (learn more here). If you do have asbestos, having a professional in to remove it ensures it is all cleaned out and disposed of properly.
Choosing Your Trades
There are ways to save money on a reno, and there are some instances where it’s truly just worth it to have the professionals come in. One of the most critical decisions is choosing the right ones.
Plumbing and electrical are two areas, which if not done correctly can end up costing more down the road. Having professionals come in will ensure everything is done correctly and is in compliance with local codes and regulations. They also might have some insight into better solutions. For example, an electrician might suggest a better switch placement or have options you didn’t know about that will increase overall functionality.
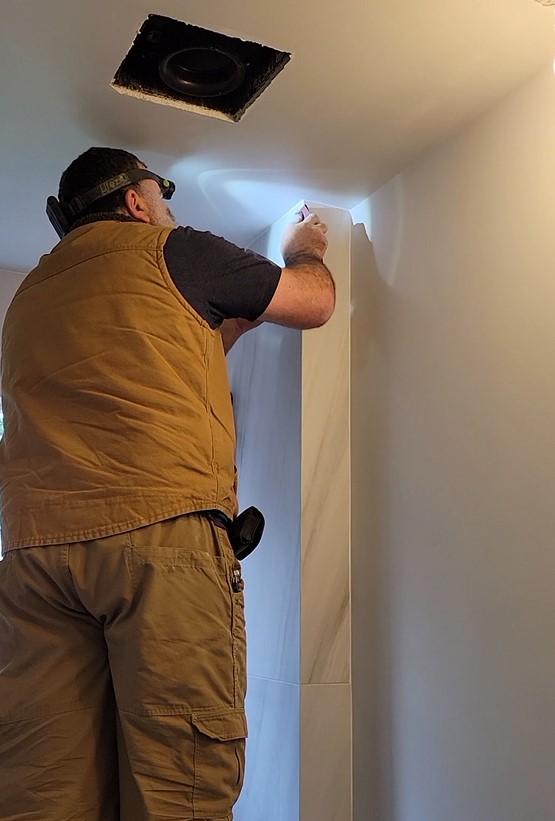
For my renovation, I knew I wanted the best tiler, no matter the cost. His attention to detail and expertise were worth every penny, and it wasn’t an area where I was going to cut corners. A skilled tiler can make all the difference in the final look and durability of your bathroom.
I think it’s also worth mentioning that while I managed to navigate the renovation successfully, the experience reinforced the value of hiring a General Contractor (GC). A GC can streamline the process, handle unexpected issues, and ensure everything runs smoothly.
This is an example of the attention to detail that I love: The tiler laid out all the tiles in order so we could adjust how the veiling would wrap around the room together before even bringing it in.

He also knew that I love mitered corners and wanted to show me how he can create a perfect tile wrap around a corner. He nailed it! The veiling wraps perfectly around the corner and it looks like one solid piece.
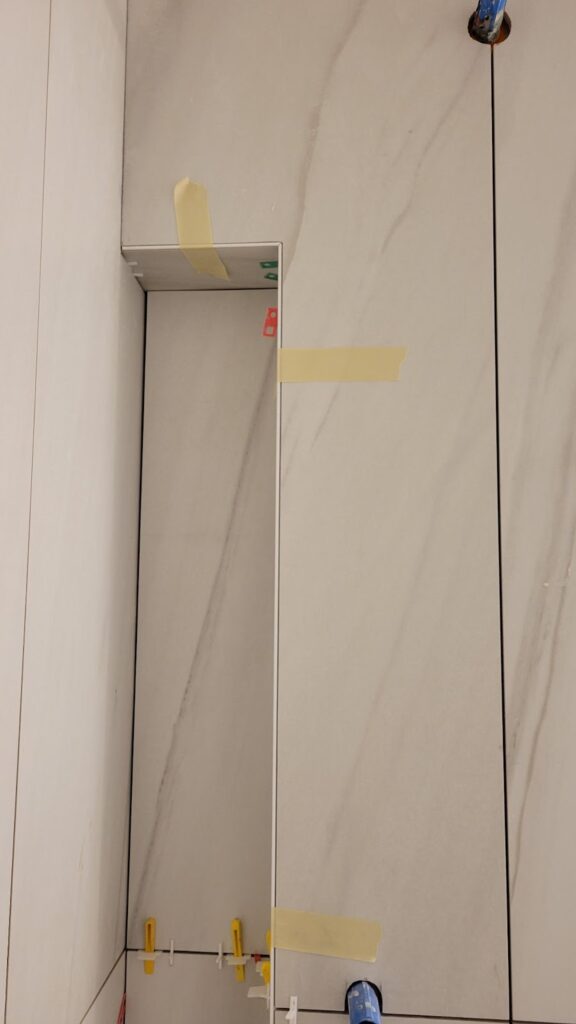
As a designer, details like this coming to life just make my heart happy. Look how the main tile was cut so the veining continued in the back of the niche!
Installing the Fixtures and Finishing Touches
Installing new fixtures is a step-by-step process. Patience and precision are key to achieving a professional finish. You’ve done all this work. Don’t just rush through it when you’re so close to completing your project. Keep in mind that small details, like caulking and sealing, can make a significant difference in the final appearance.
Since you’ve stayed this long I’ll give you some insider tips about some of the choices we made for our bathroom that I absolutely love.
Corner niche with continuous tile: It provides a seamless look and practical storage space.

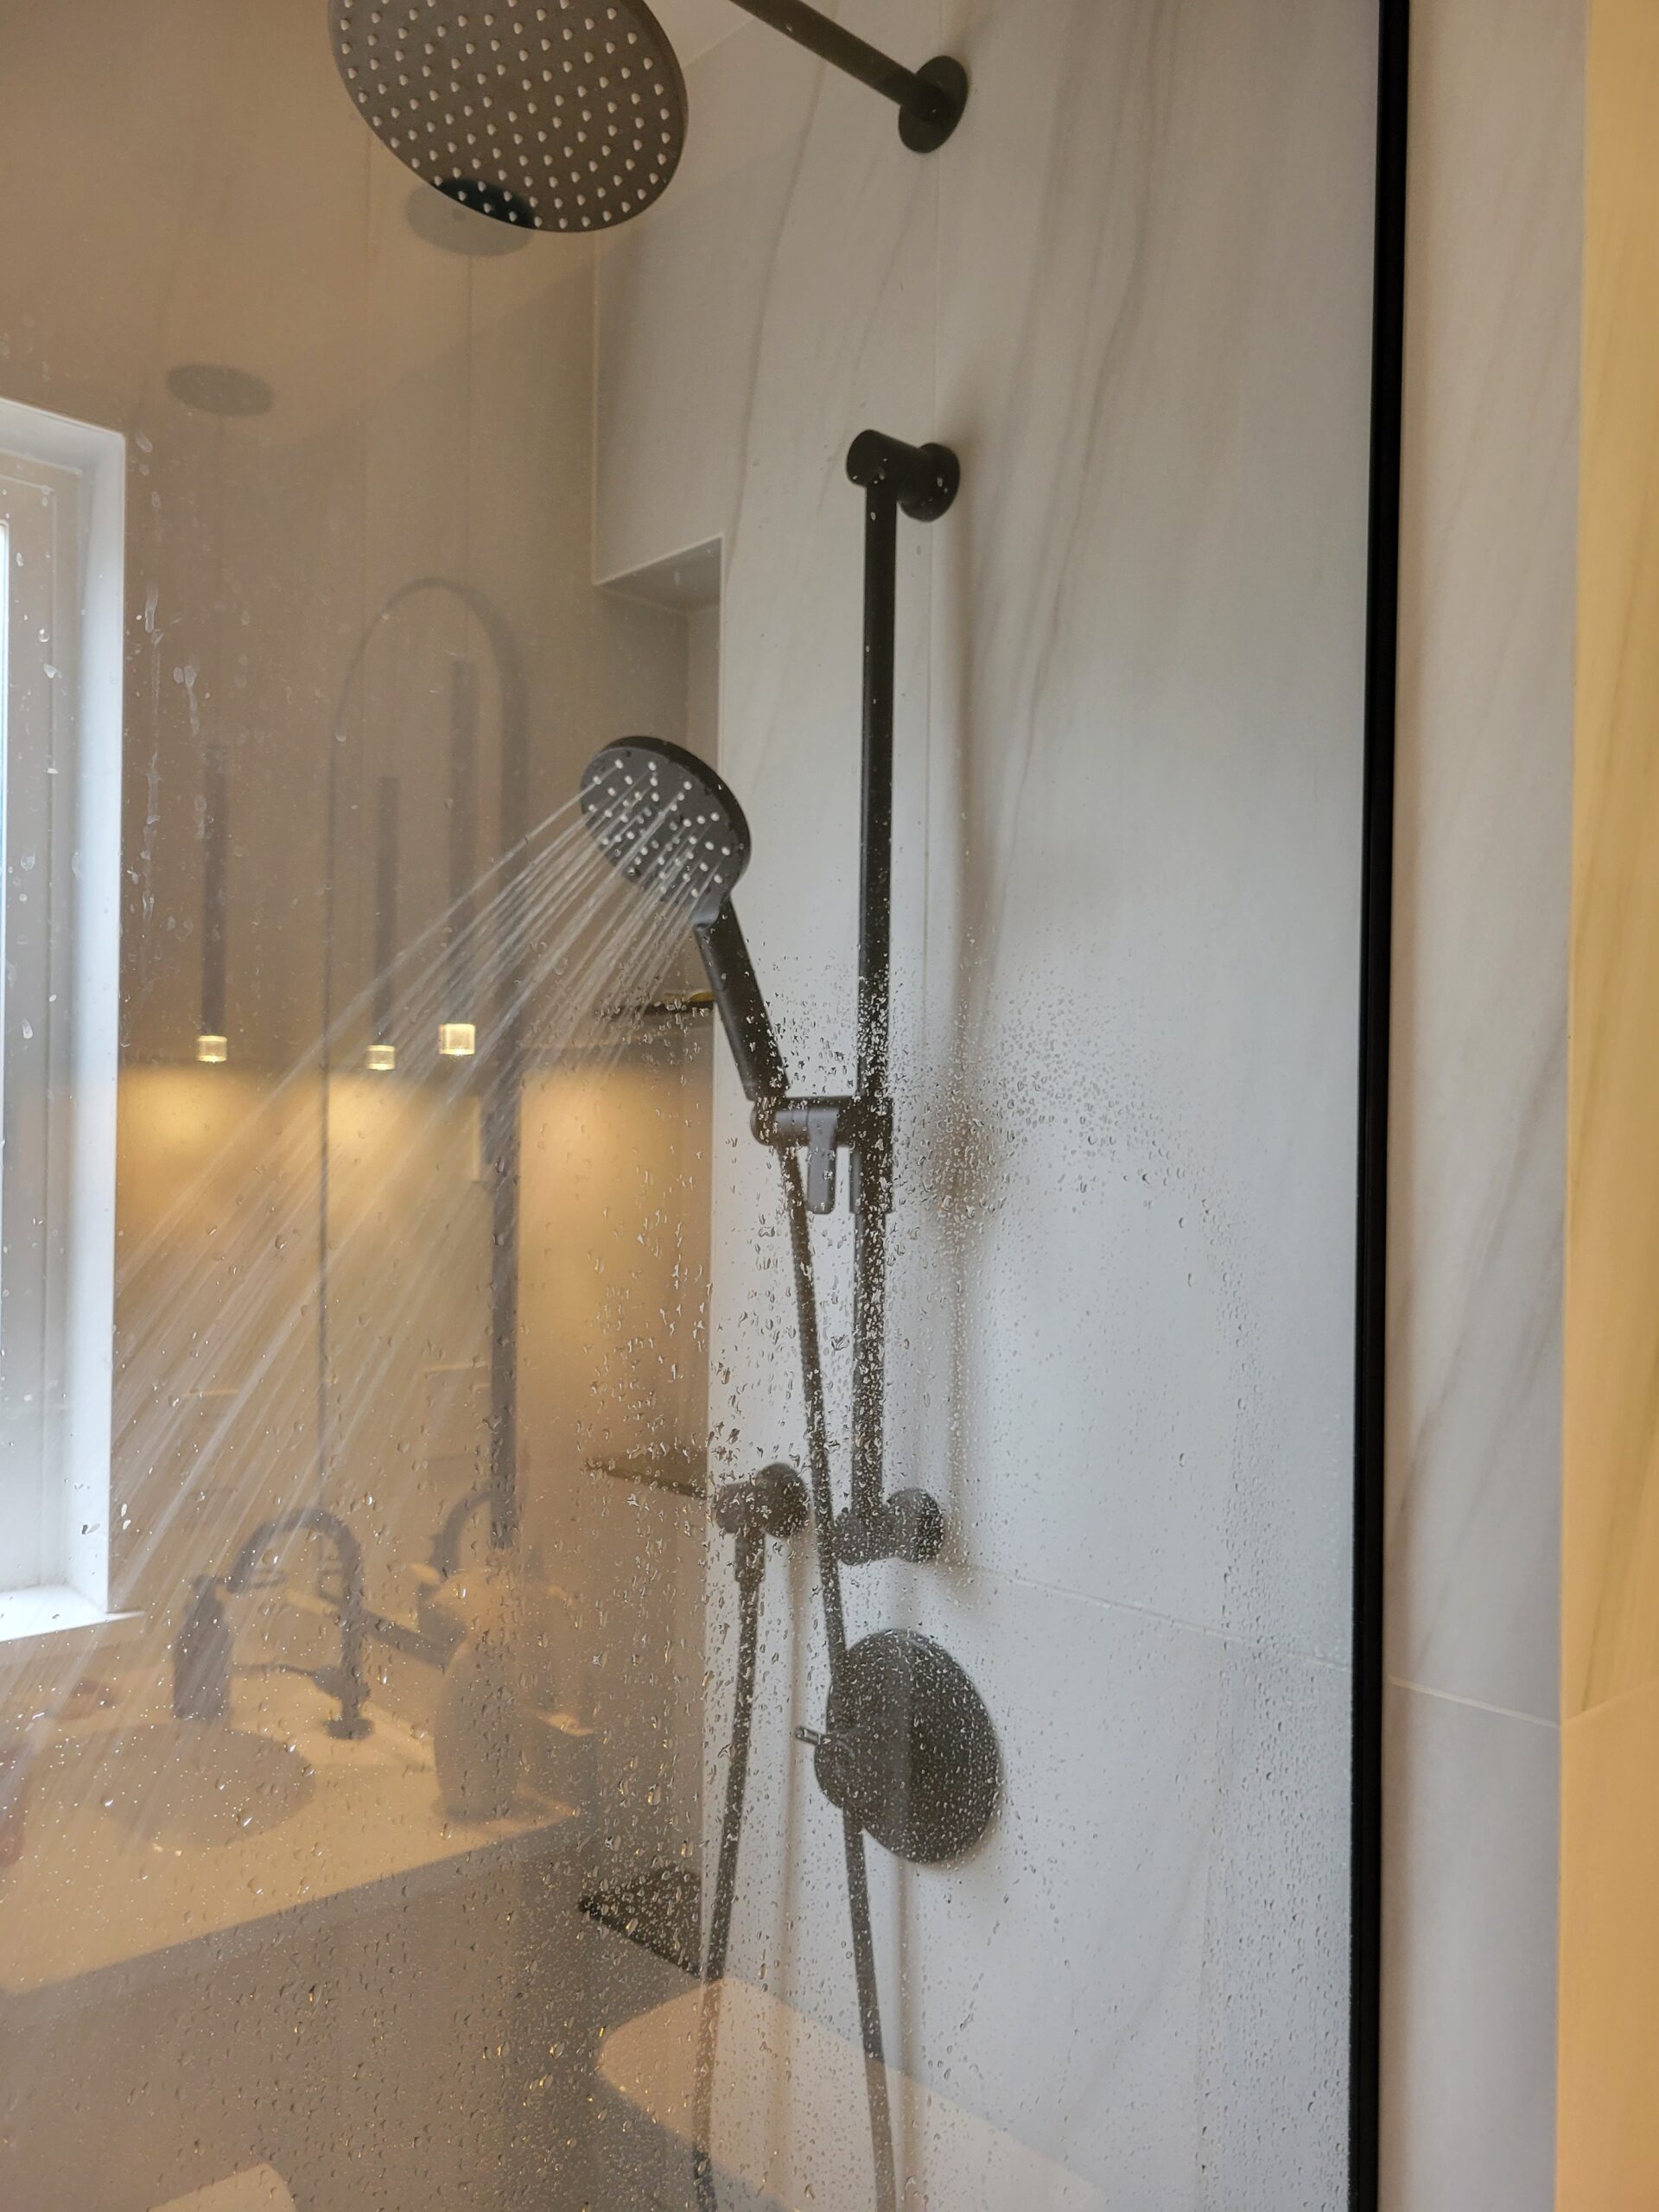
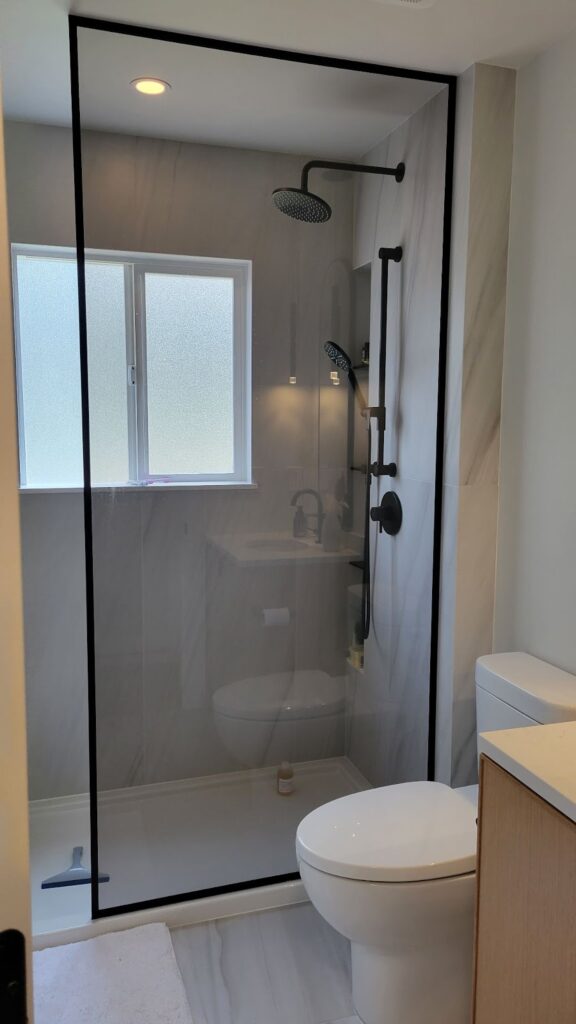
Mitered shower tile return with bronze glass: This adds a clean and sophisticated finish to the shower area. Disclaimer: The bronze glass was an upgrade and I wouldn’t consider it a budget choice… but I love it.
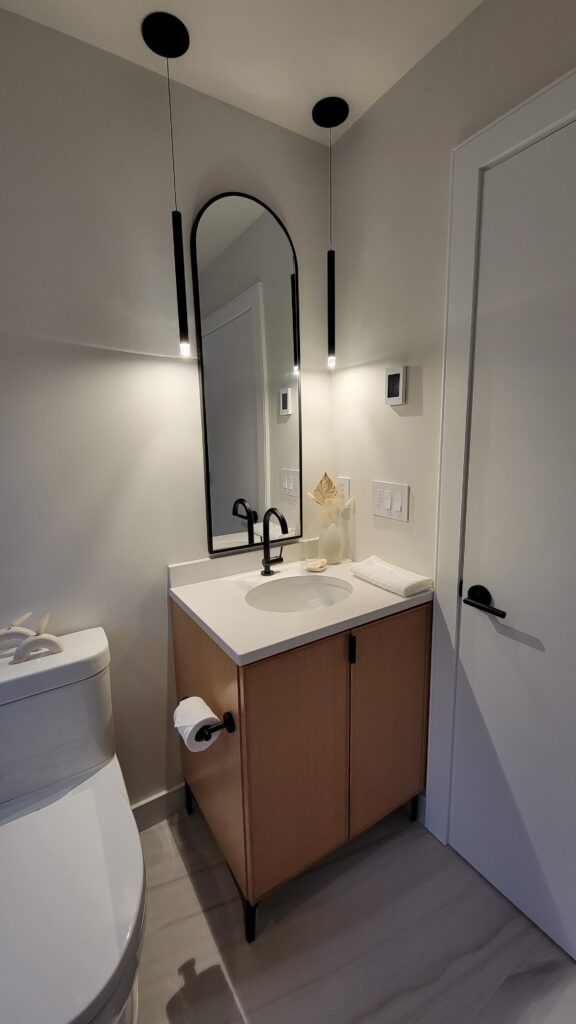
Narrow arched mirror with hanging pendants: This design choice makes the space feel taller, even though it’s just a standard 8-foot ceiling.
Metal vanity legs instead of wood: This way if water spills from not having a shower door, there is no concern about any water (or a wet towel) damaging the bottom of the vanity.
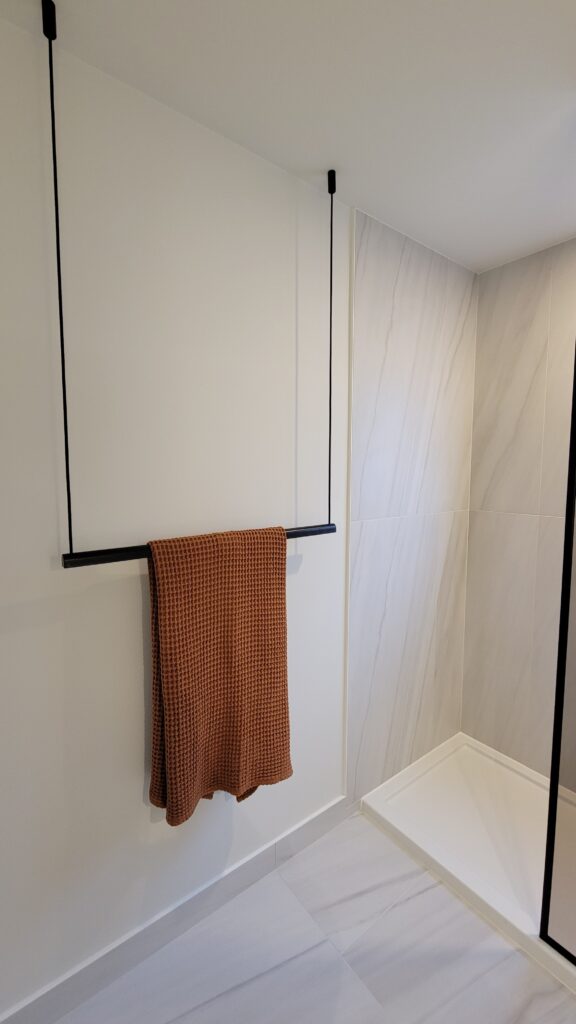
Hanging towel holder mounted from the ceiling: While it’s a stylish addition, I wouldn’t recommend it for a bathroom used by kids, as they might be tempted to swing on it.
Shelf inside the vanity for extra storage: This was a practical addition that maximized our storage space.
Tile baseboards with a Schluter easy-to-clean edge: These are not only aesthetically pleasing but also keep the floor waterproof and makes cleaning much easier.
As a bonus, here’s what I would skip next time:
Roll-out shelf under the vanity: Honestly, it wasn’t necessary. A basket would have been fine, but the center shelf in the vanity is gold and incredibly useful.
Bronze glass niche shelves: Ok I personally wouldn’t skip this because I love them and there isn’t a kid using this bathroom BUT it’s important to know that because I didn’t want to use clips on my bronze glass niche shelves, they are just glued in and I wouldn’t put more than one bottle on them at a time… not super practical or something that I have suggested for previous clients but I wanted to test it out for my bathroom.
And two details that I knew to look out for because I am a designer:
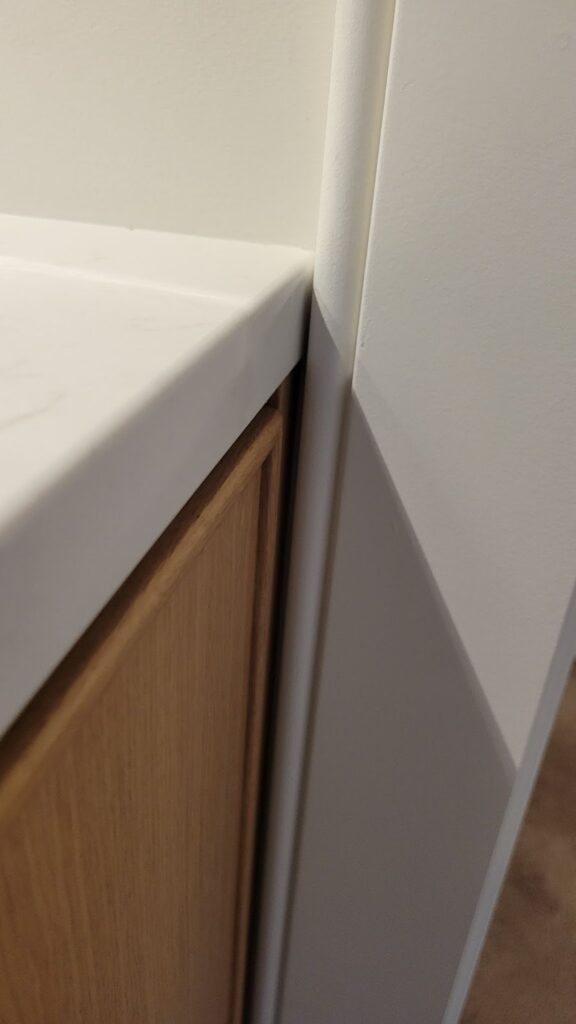
A tight fit: The countertop and depth of the vanity was reduced to accommodate the door casing width because I didn’t want to adjust the door location and didn’t want to cut into the casing… It was a tight fit, but so satisfying!
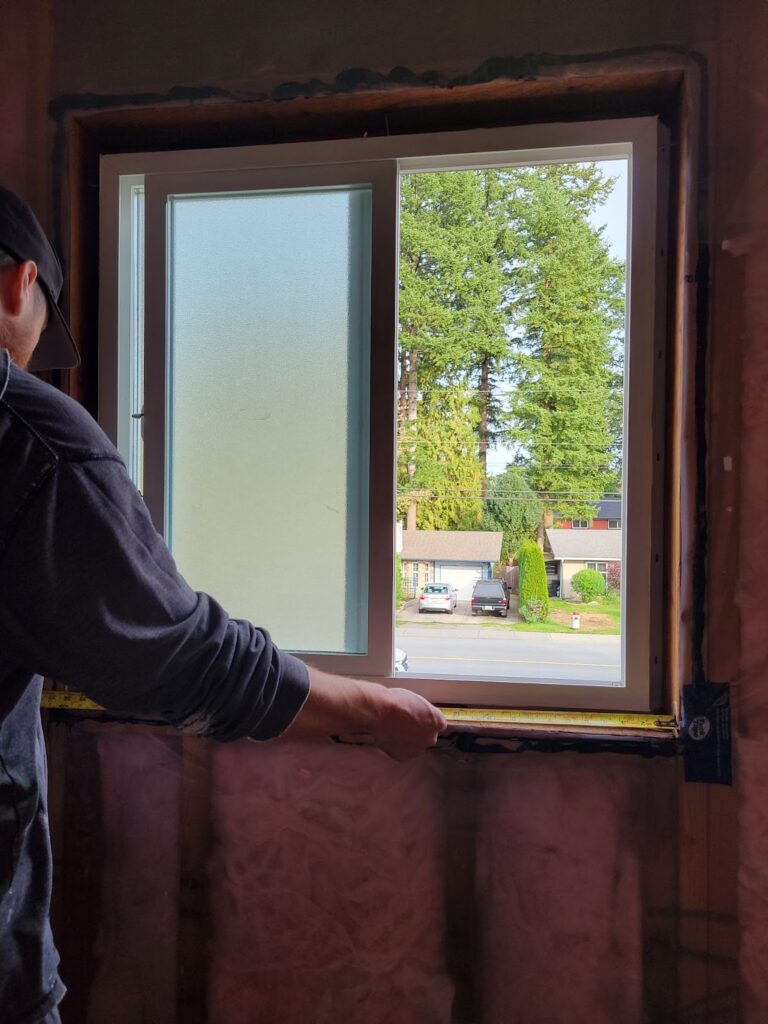
Even though we didn’t plan to change the size of the window (so we didn’t affect any of the exterior finishes) we knew we wanted to replace the window so we could ensure it was properly waterproofed since it would now be inside a shower.
Is it Really That Easy?
On paper, it might seem like this renovation went off without a hitch. But that just isn’t the reality of projects like this. You’ll run into challenges just like we did, but with some solutions ahead of time, it might make things a bit easier. Here are some of the obstacles we encountered and how we overcame them.
Everything Takes Time
It’s easy for a DIY renovation to take over, so balancing that renovation work with personal life is crucial. Especially if you have kiddos. We used time management strategies, like scheduling work around nap times, to help minimize disruptions.
Where’s My…
You don’t have control over when something will arrive. You can order in advance of your work starting but that doesn’t always guarantee it will be there when you need it. For us, we were dealing with the significant delays in product availability caused by COVID-19. Having a flexible plan and alternative options ensured the project stayed on track.
Oh So That’s What’s Under There…
There is almost always something that comes up during demolition and if you know what to look for it doesn’t always have to come as a surprise. Before demolition our bathroom had squeaky floors and through experience I know it’s almost always has to do with how the subfloor was installed. So during our reno we opted to replace the entire subfloor with a fresh sheet of plywood, nail and glue to ensure longevity in this bathroom. We also opted to add insulation in the plumbing walls and in the flooring to help reduce noise transfer- highly recommend!
Inspiration vs. Budget
I bet you’ve seen all the dream bathroom inspiration pictures on Pinterest or Instagram. As a designer, I can relate! I’m constantly surrounded by those pictures. It’s easy to dream big and want the best for your renovation. And consequently, it can be hard to keep the budget and functional needs in check. By setting clear priorities and staying focused on what’s essential, we managed to achieve our goals without overspending.
Let’s recap the items that were truly budget choices:
- Acrylic shower base
- Countertop material was picked based on what was available as an off-cut from the local supplier that I know
- Door, casings, door hardware and my toilet was from Home Depot
- Accessories and vanity door hardware was from Amazon and didn’t exactly match my plumbing fixtures (but it’s black so no one notices!)
- My vanity I ordered from a custom shop but I got a deal so it was the same price as if I bought a pre-fabricated one
- We completed a lot of the work ourselves (drywall, paint etc)
- We selected 24×48” tiles because the cost was less than half of what the larger option was
And these were my personal non-negotiable splurges (as a designer):
- The tiler of my choice, no substitutes
- Bronze shower glass with a 1” black frame, because I loooove it


Do You Recommend a DIY Bathroom Renovation?
From our experience, the final result of our budget-friendly bathroom renovation was immensely satisfying.
When it comes to designing a bathroom on a budget, it is very achievable with proper planning and product knowledge. Especially if your bathroom has a good layout and you are mainly looking for a cosmetic refresh.
If you’re considering a DIY bathroom renovation, I have some exciting news. We have a course coming out soon, and it’s for you! Join other DIYers and find everything you need to actually make your bathroom renovation happen!
I usually don’t recommend DIY’ing your bathroom renovation, simply because everyone’s skill set and trade resources vary. Hiring a contractor to manage your project can be incredibly valuable. People often label bathroom renovations as “small jobs,” but you’ll find that sourcing quality tradespeople and coordinating their schedules can be really challenging without direct relationships. Don’t underestimate the benefits of bringing in a professional. My husband and I, being in the renovation industry, had the resources and skills to manage our own project successfully.
By sharing some behind-the-scenes details of this budget-friendly renovation, I hope to inspire your bathroom remodel!
If you’re still not sure where to start, for cosmetic bathroom upgrades we offer a Design Immersion Day, you can read more about that here. Or for more complex projects, our custom bathroom design packages can offer the support and precision needed to avoid costly mistakes.
I’d love to schedule an alignment call with you to discuss if we are a good fit.
